Showing posts with label Computer Trick. Show all posts

Steps to Bypass windows 8 Login Screen


Windows 8 has default login screen when start up,If you don’t need the security of a lock screen and a log-in screen can bypass both through a few simple steps.
Windows 8 runs a tight ship by throwing up a lock screen and a log-in screen before you can dive in. But you can easily bypass those screens so you don’t have to type your password every time. Here’s how:
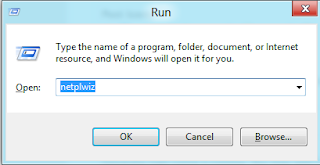
  1. First open Command Prompt by pressing win+r key.
  2. then type netplwiz and hit enter. The command for netplwiz, aka the User Accounts Control Panel, appears in the search results in the left pane. Click that command.
  3. In the User Accounts Control Panel, select the account you wish to use to log in automatically.
  4. Click off the check-box above the account that says “Users must enter a user name and password to use this computer.” Click OK.
  5. Enter your password once and then a second time to confirm it. Click OK.
  6. Restart Windows. Windows now bypasses the lock screen and the log-in screen to automatically take you to the Start screen.
  7. Change your mind? To re-enable the log-in screen, simply return to the User Accounts Control Panel using the steps above and click on the check-box for the “Users must enter a user name and password to use this computer” option.
Running the netplwiz command to bypass the log-in process also works in previous versions of Windows. But it’s especially helpful in Windows 8, where the Lock screen and log-in screens are enabled by default.
Those of you trying out the Windows 8 Release Preview in a crowded office may want to keep the log-in screen turned on. But for anyone who doesn’t need the tight security, this process can shave off a couple of steps each time you want to launch Windows 8.

How to Bring Back Windows Start Button in Windows 8


Windows 8 has no start button many of users are addicted to click on start button for nevigation. In windows 8 there is two measure complain first one is loginng screen their user must to be enter password at startup time and second one is no windows button show.

In my previous post i describe steps to bypass login screen at startup time, you can can get this by click here.

so you are directly nevigate to windows screen.

Now i explain about bring back windows button,Some of these applications are new, motivated entirely by Windows 8's supposed "shortcomings"—Stardock's Start8StartIsBack, and RetroUI all share this characteristic. Others are new versions of old apps. Classic Shell was originally a project to reinstate the Windows XP Start menu on Windows Vista and Windows 7 (among other things); it now has some Windows 8-specific functionality. Pokki is an application runtime, launcher, and marketplace; in its latest iteration it too jumps on the Start screen replacement bandwagon.

Classic Shell

Classic Shell is free, open-source donationware that gives you the option of a classic (Windows 98ish), Windows XP, or Vista/7 Start menu. At its most basic, it puts a Start button back on your taskbar — but as always with third-party utilities, it has a ton of other features and settings that you can tweak to your heart’s content (in Classic Shell’s case, there’s probably too many tweakable settings). There is apparently an option for Classic Shell to boot straight to Desktop, but I couldn’t find it.
One strong point of Classic Shell is that it successfully rebinds your Start key, so that the Start menu pops up instead of the new Metro Start screen. Hitting the Start key from Metro pops up Classic Shell, too. Other Start menu replacements don’t usually cope quite so well.
Take care while installing Classic Shell, though: It’s not just a Start menu replacement, and if you’re not careful you will end up installing Classic IE and Classic Explorer, too.

Pokki

Where Classic Shell tries to replicate the Windows of yesteryear, Pokki (free) is very much its own beast — and as much as I love the Windows 7 Start menu, I have to admit that Pokki is probably even better. It utilizes a neat “pinning” system that isn’t unlike the home screen of your smartphone or tablet (though I would argue that the Windows taskbar/superbar still does a better job). You can also add widgets to Pokki, such as Gmail or Facebook, which display your latest email or status updates.
By default, Pokki will configure your Windows 8 system to boot straight to the Desktop — and there is an option that will just completely disable the hot corners, if you so desire. (Remember, Win+C pops open the Charms menu, if you need.)

Start8

Finally, a commercial offering that will set you back $5: Start8. Start8 is very similar to Classic Shell, but it’s just a little bit smoother. Start8′s configuration interface is much easier to use (and easier on the eyes), and the actual Start menu feels much more like a contiguous part of Windows.
Start8 has a curious option where you can actually have the Metro Start screen pop up as a menu, rather than full-screen (pictured at the top of the story). This is kinda neat, though you’re probably better off sticking to the normal Windows 7-style Start menu replacement.
Like Pokki, Start8 can disable your hot corners and boot directly to Desktop. Start8 also has a bunch of configuration options for how the Start key interacts with Desktop and Metro, which can be useful if you’re looking for a very specific functionality.
Download Start8 ($5, free 30-day trial)

Internet Download Manager (IDM) Free Download


Internet Download Manager (IDM)


Internet Download Manager : The fastest download accelerator

Internet Download Manager (IDM) is a tool to increase download speeds by up to 500 percent, resume and schedule downloads. Comprehensive error recovery and resume capability will restart broken or interrupted downloads due to lost connections, network problems, computer shutdowns, or unexpected power outages. Simple graphic user interface makes IDM user friendly and easy to use.

Internet Download Manager has a smart download logic accelerator that features intelligent dynamic file segmentation and safe multipart downloading technology to accelerate your downloads. Unlike other download accelerators and managers that segment files before downloading starts, Internet Download Manager segments downloaded files dynamically during download process. Internet Download Manager reuses available connections without additional connect and login stages to achieve better acceleration performance.

Internet Download Manager supports proxy servers, ftp and http protocols, firewalls, redirects, cookies, directories with authorization, MP3 audio and MPEG video content processing, and a large number of directory listing formats. IDM integrates seamlessly into Microsoft Internet Explorer, Netscape, MSN Explorer, AOL, Opera, Mozilla, Mozilla Firefox, Mozilla Firebird, Avant Browser, MyIE2, and all other popular browsers to automatically handle your downloads. You can also drag and drop files, or use Internet Download Manager from command line. Internet Download Manager can dial your modem at the set time, download the files you want, then hang up or even shut down your computer when it's done.

Key features of Internet Download Manager:

* All popular browsers and applications are supported! Internet Download Manager supports all versions of popular browsers, and can be integrated into any 3rd party Internet applications.

* Download with one click. When you click on a download link in a browser, IDM will take over the download and accelerate it. IDM supports HTTP, FTP and HTTPS protocols.

* Download Speed. Internet Download Manager can accelerate downloads by up to 5 times due to its intelligent dynamic file segmentation technology.

* Download Resume. Internet Download Manager will resume unfinished download from the place where they left off.

* Simple installation wizard. Quick and easy installation program will make necessary settings for you, and check your connection at the end to ensure trouble free installation of Internet Download Manager

* Automatic Antivirus checking. Antivirus checking makes your downloads free from viruses and trojans.

* Advanced Browser Integration. When enabled, the feature can be used to catch any download from any application. None of download managers have this feature.

* Built-in Scheduler. Internet Download Manager can connect to the Internet at a set time, download the files you want, disconnect, or shut down your computer when it's done.

* IDM supports many types of proxy servers. For example, IDM works with Microsoft ISA, and FTP proxy servers.

* IDM supports main authentication protocols: Basic, Negotiate, NTLM, and Keberos. Thus IDM can access many Internet and proxy servers using login name and password.

* Download All feature. IDM can add all downloads linked to the current page. It's easy to download multiple files with this feature.

* Customizable Interface. You may choose the order, and what buttons and columns appear on the main IDM window.

* Download Categories. Internet Download Manager can be used to organize downloads automatically using defined download categories.

* Quick Update Feature. Quick update may check for new versions of IDM and update IDM once per week.

* Download limits. Progressive downloading with quotas feature. The feature is useful for connections that use some kind of fair access policy (or FAP) like Direcway, Direct PC, Hughes, etc.

* Drag and Drop. You may simply drag and drop links to IDM, and drag and drop complete files out of Internet Download Manager.

* IDM is multilingual. IDM is translated to Arabic, Bosnian, Bulgarian, Chinese, Croatian, Czech, Danish, Dutch, French, German, Hungarian, Italian, Japanese, Lithuanian, Macedonian, Polish, Portuguese, Romanian, Russian, Slovenian, Spanish, Thai languages.

(Password : onlytrick.com)

Here Is the video Guide to download and Install and Patch IDM and also How to Download Youtube video using it.
How To Download Any Thing on the Internet Using Torrent File?


UtorrentTorrent files are really life saving things files on the internet. They allows us to download music albums, movies (even the 1080p ones), all the released softwares etc. You got what i saving about ah?. Yeah its kind of illegal. But, its obvious that an ordinary person can’t afford the price of all the things i listed. So, we go for the illegal way. As the torrent wont offer any direct download, the download process won’t be that easy for a newbie. Once if you got the trick you will be fine with the downloading procedure. So, i thought i should have a blog post about this. Trust me! you will enjoy the way of going illegal in this thing.

The main thing you need, to download, a torrent file is, the software called utorrent. You can get it for free from here and it is the best one out there. It is light weight too! like, weights only about few KB. Next thing is the torrentz site. As we say Google is the ultimate search engine for all the things, then, you can say torrentz is the search engine for all the torrent files available. So, that’s all about the introduction part. Lets get started.

Top 10 Free Screen Recorder Softwere


Whenever  you want present your Web-Document,Tutorial or any Softwere product then you must have to need Screen Recorder Softwer  And, it spreads faster as anyone can easily embed the video (if supported) to any website. Here is a collection of 10 free screen recording softwares for creating attractive 


screencasts:

CamStudio

CamStudio
CamStudio is an open source screen recorder software which can record every screen and audio activity on a computer & create industry-standard AVI video files or bandwidth-friendly Streaming Flash videos (SWF).
O.S.: Windows

Jing

Jing Screen Recorder
Jing can both take screenshots & capture a screen as videos. It is possible to add textboxes, arrows or rectangles to highlight spots.
It can send the generated outputs to Screencast.com, Flickr, a FTP account, Twitter & more.
With a microphone, you can record audio with the video as well.
O.S.: Windows, Mac OS X

Webineria

Webineria - Free Screen Capture
This is a very easy-to-use open source software to create screencasts.
It records the screen as an .AVI file & offers an option to create .FLV file from it. With the help of hotkeys, it is possible to start-pause & stop recording.
A great feature is, it can combine another video input (like webcam) with the screen recording process.
O.S.: Windows

Wink

Wink
Wink is a tutorial and presentation creation software which can capture screenshots & enables you to add explanation boxes, buttons, titles & more.
It supports various output formats like .EXE, .FLV, .HTML, etc.
O.S.: Windows, Linux

UltraVNC Screen Recorder

UltraVNC Screen Recorder
UltraVNC Screen Recorder is based-on CamStudio source with updates to improve the performance.
It supports both audio & screen capturing.
O.S.: Windows

Windows Media Encoder

Windows Media Encoder
Windows Media Encoder is a powerful application for capturing audio and video content with high-quality multichannel sound, high-definition video quality, and support for mixed-mode voice and music content.
You may find this helpful: Getting Started with Screen Capture Using Windows Media Encoder.
O.S.: Windows

BB FlashBack Express

BB FlashBack Express
BB FlashBack Express is the free version of some other advanced series. It can record from a video source, screen & audio.
It can export to AVI or FLV & has integrated support for direct uploading to the popular video sharing websites.
O.S.: Windows

CaptureFox (Firefox add-on)

Firefox Screen Capture
CaptureFox is a Firefox add-on which can record screens frame-by-frame to create tutorials. It also supports audio recording.
O.S.: All major operating systems

uTIPu TipCam

TipCam
TipCam, besides the standard screen recording with audio & video, has various features like:
  • has AVI & FLV support
  • audio can be re-recorderd
  • beginning & end parts can be trimmed
  • video can zoom to the mouse cursor with smart zooming
  • ability to draw free-style during recording
O.S.: Windows

Krut

Krut Screen Recorder
This is a tiny Java application (works on many platforms) for creating screencasts.
Krut records movie files of selected parts of your screen in the quicktime mov format, including sound. The program has an intuitive and compact user interface.
O.S.: All major operating systems

How to recover deleted files from memory card


For recovering deleted files from memory card or hardisks,pendrive there are a lots of software on internet but i recoment pandora recovery tool its free and easy to use.


How does it work?

When you delete a file on FAT32 or NTFS file system, its content is not erased from disk but only reference to file data in File Allocation Table or Master File Table is marked as deleted. It means that you might be able to recover deleted files, or make it visible for file system again.
Pandora Recovery allows you to find and recover recoverable deleted files from NTFS and FAT-formatted volumes, regardless of their type - you can recover pictures, songs, movies or documents. Pandora Recovery will scan your hard drive and build an index of existing and deleted files and directories (folders) on any logical drive of your computer with supported file format. Once the scanning is complete you have full control over which files to recover and what destination to recover them to. You can BROWSE the hierarchy of existing and deleted files, or you can use SEARCH functionality to find a deleted file if you remember at least one of the following:
- full or partial file name,
- file size,
- file creation date, or
- file last accessed date


On top of that, Pandora Recovery allows you to preview deleted files of certain type (images and text files) without performing recovery. This feature becomes really important if you are forced to recover deleted files to the same drive. Currently you can preview files having several image file types (BMP, GIF, JPG, PNG, ICO,TIF, TGA, PCX, WBMP, WMF, JP2, J2K, JBG, JPC, PGX, PNM, RAS, CUR) and several text file types (TXT, LOG, INI, BAT, RTF, XML, CSS). Quick Viewer allows you preview file contents as text if it cannot find appropriate viewer for it. To use quick viewer you can select deleted file and or click the Quick Viewer icon or right click on deleted file and select 'Quick View'. Quick View will then display a preview of deleted file.
Learn more about Pandora Recovery features and intrinsic
1:to recover files download 


Pandora Recovery.

2:-install it.
3:-press next recover files.


3:-click (No , I did not find my files.)and press next.

4: select drive that was contain that deleted file and press next button.
5:-select (Deep surface scan) after that press next.
6:-press (start deep  surface scan).


7:-search and select the file you deleted and do right click a recover it.
Your file is recovered now.enjoy.

How to Turn your Windows 7 PC into a Wi-fi Hotspot


Now a days most of persone have smart phone that have enable 3G and GPRS,for that purpose use the internet on mobile phone using laptop/pc net connection there is best option,so today i Give tutorial about How to Turn your Windows 7 PC into a Wi-fi Hotspot.
If you are not using Windows 7 yet, you can accomplish the same thing in Windows Vista, XP or even Mac OS X. The Windows 7 method is almost identical to Windows Vista, but XP requires a few more steps.


Step 1 - Network and Sharing Center
Before we begin, make sure that you have got a laptop or desktop with a wireless card (Wi-fi card). Your laptop or desktop must be connected to a wired network and the wireless card must be free so that it can be used as a Wi-fi hotspot. Please note that this won’t work on some networks that use group policies to enforce TPS report and prevent you from having any fun at all.


Step 2 - Set up a connection or network
Let’s begin.
Go to “Network and Sharing Center” through the Control Panel or quickly type “Network” in the Start menu’s search bar and click on “Network and Sharing Center”. Once you are there click on “Set up a new connection or network”. You’ll be prompted with a wizard that allows you to connect to VPNs, dial-up, or create a new ad hoc wireless network. If you see this wizard, you are on the right path. Click on Next.
Step 3 - Enter Details
On the new window, provide a name to the network, set the security type and the security key which will act as password while other Wi-fi devices try to connect to this network. Please remember that WEP is much easy to crack compared to WPA2. So, it will be better if you select “WPA-2 Personal” for Security type. Also, provide a strong password to avoid misuse of your wireless ad hoc network. Tick mark the “Save this network” and click on OK and finally click on Close.
At this point your ad hoc network should be running and ready to start connecting your devices, but you’ll have to hold off for just a minute.
Step 4 - Network List
You’ll notice that the ad hoc network that you created gets added to the quick-select wireless network list—when you disconnect from your ad hoc network, it’s the same as stopping it. Connecting to the network is the same as starting it back; this way you can quickly switch back and forth between connections with just a few clicks.
The last step is enabling connection sharing through your regular network card, which will allow anybody connected to your ad hoc wireless to use your internet connection. To do so, go to the “Network and Sharing Center”, click the “Change adapter settings” link on the left, and then find your network connection (wired one) in the list—it’s very important that you only enable internet connection sharing on the adapter that is actually connected to the internet. In this case, my wired internet access goes through my Local Area Connection, so I’ve enabled it there.

Tick mark on both the options provided in the Sharing tab. Also, select you wireless connection card in “Home networking connection”. Don’t worry if there isn’t any option like “Home networking connection”. Click on OK.
At this point, you should be able to connect any Wi-fi enabled device to your new ad hoc network and access the internet, or even share files directly with your laptop.


Remote Control Your PC Anywhere On Your Android Device


Now you can bring along your home PC anywhere as long as you have your Android device with you (and a Data Plan of course).

The applications are limitless. I use it to:
  • Surf websites that needs Java plugin (e.g. online movie ticket booking)
  • Monitor my Torrent downloads
  • Send a file from my home PC to my office email (life saver!)
  • etc...


You just need to install TeamViewer for PCdownload this free app and you're good to go!
I tried this app using Edge connection and it's quite usable. Though 3G or higher connection is recommended to have a smooth experience :) Try setting quality to 'Optimize speed' in the settings if your internet is slow.
PS: Make sure you have a data plan because normal mobile internet charges apply when using this app.


Steps to Synchronize Video And Subtitles


Watching movies with fast or delayed subtitles is like singing a karaoke song when the subtitles doesn’t sync with it’s music. It can be stressful especially when it’s a movie you like to watch, but which is not in your own language.
subtitle sync How to Synchronize Video and Subtitles
Probably, the ability to just pause a movie and drag the subtitle to a suitable timeline position may put you at ease, but this is never the case. So having the option to edit the subtitle so that it will sync with your movie timeline may be a solution you want to look into.
That’s right, there’s a way to re-sync your movie subtitle and we will show you how to do it withKMPlayer, a video player that supports many video formats with options to change, re-sync and even edit your movie subtitle.

Sync Subtitles With The Video

In this tutorial, we will be using KMPlayer to sync subtitles with its video, therefore if you don’t have one, head over to the download page and install KMPlayer on your computer.
subtitle sync install kmplayer How to Synchronize Video and Subtitles
  1. When it’s already installed, launch KMPlayer and open the video you want to re-sync the subtitles of.
    subtitle sync kmplayer How to Synchronize Video and Subtitles
  2. Click on the Control Box at the bottom left of the KMPlayer.
    subtitle sync control box How to Synchronize Video and Subtitles
  3. Click on the ‘A’ icon to edit (re-sync) the subtitles.
    subtitle sync edit subtitles How to Synchronize Video and Subtitles
  4. Now you will be presented with a small window of options to edit your subtitle.
    subtitle sync options How to Synchronize Video and Subtitles
    The button ‘Sync-’ is to delay the subtitle for the current timeline, while ‘Sync+’ is to fast-forward the subtitle, both changes are by 0.5 seconds. Click on ‘Resync’ if you want to specifically set the delay time.
    In this tutorial, we will do some changes for the whole movie, now click on ‘More…’ button.
  5. Now you will be listed with all available subtitles for the video, alongside the timeline.
    subtitle sync edit box How to Synchronize Video and Subtitles
  6. Double-click on the subtitles you want to re-sync. At the top left of the edit window, there are number of buttons you can use to re-sync your subtitles.
    subtitle sync edit box buttons How to Synchronize Video and Subtitles
    [ - Delay subtitles by -0.5 seconds
    ] – Push forward subtitle by +0.5 seconds
    TS – Sync whole subtitle with a specific time
    SS – Sync the selected subtitle with a specific time
    R – Reset subtitle sync
    S – Reset selected subtitle sync
    There are more buttons at the top right of the window, but you will be using more on the left.
  7. Now to specifically re-sync selected subtitle, double-click on any specific subtitle, click on the ‘SS’ button and set the time you want to adjust, use positive integer to push-forward while negative integer to delay a little. When ready, click ‘OK’ and your subtitles will re-sync following the time you have set.
    NOTE: Time in millisecond
    subtitle sync adjust How to Synchronize Video and Subtitles

How to install Android apps In Windows? : Bluestacks App player


I’m an Apple user and I occasionally use Android devices when I get them for review. At times, I miss playing with many cool Android apps and I have been planning to buy an Android phone or tablet in coming days just to try apps. Good news here is, I came across a free software which will let me run Android apps on Windows 7.


What is Bluestacks App player?

A start-up company called Bluestacks come up with an idea to empower users to Install and run Android apps on Windows PC’s. Blustack is basically an android app player for Windows, which will let you search and use any android apps from Google play market. Also, if you are an existing android user (tablet or Phone), you can download their cloud connect app from Google play and it will  let you sync apps between your phone and Bluestacks app player on your Windows.

Bluestacks app player

That means you can enjoy all your favorite android apps on windows without actually doing anything apart from download and installing this software. For Windows 8 user, they are coming up with a compatible version soon.


How to use Bluestacks for Running Android apps on Windows


This software is very easy to use and all you need to download Bluestack app player from here. It’s an online installer and file size is above 125Mb, so it will take few minutes to install depending upon your internet connection speed. Once, this software is installed Bluestack home screen will open with few pre-installed app. It also shows a dock at the top in Windows 7, which you can use to quickly use this software.

There is also a search feature which you can use to search android apps and install them from there. Right now, I tried their latest beta version and experience is 3/5 but the idea of using android apps on Windows itself is exciting. I quickly Installed Zite and pocket app, which I mostly use on my iPad for reading. Now, you might find me sharing more article on Twitter and Google plus, as my favorite tablet feed readers are on my desktop now.

INstall Android app Windows
Setting panel of Blue Stacks

If you wish to uninstall any android apps from Bluestacks, click on wrench icon at bottom, click on Manage applications and you can uninstall it. Well, when I came across this useful software, I couldn’t stop myself from Installing it and sharing it here. Here is a video demo of this software:


If you are a tech blogger who often cover Android news and don’t have an actual android device, you can use this free software to install android apps on Windows computer and you can come with your own review. Your user experience might not be the same, but you can always get more info from the app after trying it.

How did you like the idea of Bluestacks app player? Are you going to try it or have you tried it? Do let us know your review and feedback. Also, if you find this software useful, don’t forget to share it on Facebook and Google plus.

The Official Prices of New MacBooks in India


Apple has upgraded their existing MacBook Air and MacBook Pro line of notebooks and also introduced a new 15″ MacBook Pro notebook with Retina Display. The new machines will ship with Mountain Lion (Mac OS X 10.8).

The following table lists the current prices of various MacBook models in India including the all-new Retina-display MacBook Pro.

MacBook Prices in India

MacBook Air 11MacBook Air 13MacBook Pro 13MacBook Pro 15MacBook Pro with Retina
MacBook Air 11″MacBook Air 13″MacBook Pro 13″MacBook Pro 15″New MacBook Pro 15″
  • 1.7GHz dual-core Intel Core i5 processor
  • 4GB RAM
  • 64GB flash storage
  • Intel HD Graphics 4000
  • 1.8GHz dual-core Intel Core i5 processor
  • 4GB RAM
  • 128GB flash storage
  • Intel HD Graphics 4000
  • 2.5GHz dual-core Intel Core i5
  • 4GB RAM
  • 500GB hard drive
  • Intel HD Graphics 4000
  • 2.3GHz quad-core Intel Core i7
  • 4GB RAM
  • 500GB hard drive
  • Intel HD Graphics 4000
  • NVIDIA GeForce GT 650M with 512MB of GDDR5 memory
  • 2.3GHz quad-core Intel Core i7
  • 8GB RAM
  • 256GB flash storage
  • Intel HD Graphics 4000
  • NVIDIA GeForce GT 650M with 1GB of GDDR5 memory
Indian Rupee67,900 (64 GB)
Indian Rupee74,900 (128 GB)
Indian Rupee81,900 (128 GB)
Indian Rupee99,900 (256 GB)
Indian Rupee81,900 (2.5 GHz i5)
Indian Rupee99,000 (2.9 GHz i7)
Indian Rupee122,900 (2.3 GHz i7)
Indian Rupee152,000 (2.6 GHz i7)
Indian Rupee152,900 (2.3 GHz i7)
Indian Rupee192,900 (2.6 GHz i7)
See apple.com to know the various configuration that are available for these models. All the above prices are courtesy Gautam Mahtani.
One more thing. If you are planning to buy a MacBook in India, or any other Apple product, try to go through an authorized reseller and not the Apple Store as resellers can almost always offer a better deal. And if you have a college-going student in your family, they can help you secure a 6% discount on all Apple products in India (except for the iPhone I think).