Showing posts with label Mobile Trick. Show all posts

Location-based Alerts for Android


Setting location based reminders is very  simple in android. The app is integrated with Google Maps and you can just tap a location on the map to set a reminder when you are around that place.
You can  create one-time alerts or  configure it to repeat on particular days


How do you locate your mobile phone if the ringer is off? Maybe you switched the phone to vibrate mode while you were in a meeting and now you dont find it .
Wouldn’t it be nice if you could use other  phone  to turn on the ringer of your missing phone?
Here is an app for it
Agastya, a new Android app that lets you “remotely” perform various tasks on your phone from any other phone via simple SMS commands. The other phone, that is sending the commands, need not be running Android – even the basic Nokia phone would do

The workflow is very  easy. You send an SMS command from a friend’s phone to your own phone in a given format and the app reacts accordingly.
For example, a command like “ringer” would turn on the ringer while “silent” would put the phone to silent mode.
The best feature of this app is it  helps you retrieve your missed calls list or your incoming text messages via, you got it right, SMS.
Here’s a complete list of SMS commands that you can try on your Android phone:

  • SILENT – Turn off the phone’s ringer
  • RINGER – Turn on the ringer
  • IMEI – Get the IMEI number* of your phone
  • LAST MESSAGES – Retrieve the last 5 text messages received on your phone
  • LAST CALLS – Know the last 5 missed/received/dialed numbers
  • – Fetch the contact number of a person from the address book.

4G Samsung Galaxy's Audio/Speaker Not Working: What to do?


As much as we adore our Smart phones, there are some tiny things that may pop out to make us hate them. In most cases, it becomes annoying when your priced Smartphone crashes in front of your friends and co-workers. Moreover, instead of just enjoying the convenience it can offer, you are now worried on both the lost benefits and the money you would need to repair it.

Don’t worry. To all 4G Samsung Galaxy users out there, this article will help you solve your problems. This article will tackle on what you should do when suddenly your 4G Samsung Galaxy’s audio or speaker stops working. Here are the simple tips on how to manage it.

1.    Check the volume

The very basic move to troubleshoot a lost sound is to check the volume. Sometimes, especially if you are a new user, you may not locate the volume keys of your phone right away. The result will be accidental turning down of volume. So before you panic, please always locate and remember where your volume keys are. For 4G Samsung Galaxy, it’s in the left side of the phone.

2.    Check the settings

Most of the Smartphone’s applications are authorize to manipulate your phone’s settings without your knowledge. Since 4G Samsung Galaxy is an android, you can check its settings by going here. First you must go to home and look for the settings with its famous picture logo of screw driver and a wrench. Under settings, choose sounds and review its settings if its sync with your applications especially the alarms.

3.    Remove the batteries

In rare case, the problems with the phone’s speakers are related to the battery. It is because of the fact that speakers are voracious eaters of energy. Now, if there is a circuit problem from the battery to the speakers, problems such as sudden loss of sound from the speakers may arise. People who complain about this problem were relieved because of this step. Remove the batteries for 5 minutes just to re-establish the circuit once more.

4.    Change the hardware

If the 3 steps won’t work in your case, then you must try this risky yet very fulfilling challenge. Try to replace your speakers. How? Read and review the brand of your phone’s speakers. Order it at EBay. It will not cost you more than you will pay to the professional cell phone technicians. However, this is very risky for some parts may be misplaced. The order will arrive for about two weeks. With that length of time, you can still have enough days to review and practice your cell phone repair skills.

5.    Volume down

This is not part of the troubleshooting tips but an advice on how to take care of your valuable Smartphone. Don’t abuse the volume keys. Put the volume level to a tolerable level. This will preserve not only the speakers but as well as your hearing. Using a headphone can also be a good idea as this can be replaced easily if broken.

You can check out mobile broadband deals and find info at Broadband-Expert.co.uk.

Cell Phone Repair: Trick to repair it from water damage


Repair cell phone from water damage

The online cell phone repair training course helps in various ways, as during any small damage in mobile phones one can easily consult these online programs for getting the solutions. One of the most common damage in mobile phones is the water damage. Many times due to rain or any other thing the mobile phone gets wet, this leads to no proper working of the mobile phones. Sometimes due to excess of the water damage the mobile phones stop working totally. By consulting a good training program one can easily find out various tricks for the small problems.

Sometimes the problems are temporary; they can be solved by just using a simple cloth or any piece of cloth. One can easily rub the wet areas, can dry the things. Many people are very careless and they don’t know about the sensitivity of the mobile phones. These phones are used daily for so many different purposes, earlier mobile phones were just for communicating but now there are so many other purposes which are solved by these phones like navigation, messaging, emailing, Skype, etc.
 so by handling them in more appropriate ways, one can find avoid any type of damaging. In this article we will see how we can use some basic tricks for cell phone repair which are damaged by water:
·         First it is important to take out the battery of the mobile phone and also the other small parts like memory card, etc. open up all the keep them aside.
·         Take a container which has a tight lid, air tight containers are preferable.
·         Place the battery in this container and put rice in this container and close the container tight.
·         Keep the container aside for overnight.
·         Next day, take the battery out and place the cell all together. It would start working.
·         If does not works, than go for professional services as the problem can be serious.

Rice is used as it acts as a natural drier; it absorbs all the moisture and makes the battery dry. This trick works most of the time when the water damage is not very serious. If proper measures are not taken and the mobiles are used just after simple cleaning after it is damaged by water. This would burn the wires inside the phone and the phone will never work. This leads to loss of expensive mobile which can be repaired with proper care. Thus, online cell phone repair training course can help a lot in saving money which can be spend on buying a new mobile phone, the mobile phone is needed by everyone in their day to day life. It is a very important thing as it is used for so many different purposes than just communicating.

Author Bio:  Anna is a person with a passion for writing. She has written many articles on various topics, for more information you can check her other blogs.

Root Your Nook Color in 5 Easy Steps


So you've heard that you can jailbreak your Nook and make it a full-scale android tablet. Well, you've heard right. First you have to buy one; the good news is there's a Barnes and Noble coupon code that can get you a hefty discount. Once you get the Nook you only need a few other things to root your system:

A 128 MB MicroSD card

A computer with a USB port and ability to read/write MicroSD cards

A WiFi connection for your Nook

A Gmail or YouTube linked account

A program to write disk images

Once you've got all of these things together, it's time to take your Nook from books to beast. BUT, and this is a big but, before you do it you have to complete the Barnes & Noble registration process. If you don't, you won't be able to use your Nook to purchase books from them.

How to Root the System

Step 1 : Auto-Nooter is the program that you need for this process. Download the Auto-Nooter system image file that is appropriate for your Nook firmware version.

Users with the 1.0.0 firmware will need Auto-Nooter 2.12.15.

Users with the 1.0.1 firmware will need Auto-Nooter 2.12.25.

Users with the 1.1 firmware will need Auto-Nooter 3.0.

Users with the 1.2 or 1.3 firmware will need HoneyComb

Step 2 : Take the version of Auto-Nooter that you downloaded and write it to a MicroSD card. Do not simply copy it, this will not transfer an important component over to the MicroSD. Use Win32 Disk Imager or the DD command to achieve this.

Step 3 : Power down your Nook and insert the MicroSD card in the card slot. The slot is located under the back storage flap.

Step 4 : Turn the Nook back on.

Step 5 : The Nook will load with a black screen and stay this way for several minutes. Don't panic. This is a normal thing while Auto-Nooter loads. When Auto-Nooter is done, it will reboot the system.

Initial Re-boot

When the Nook reboots it will load the regular splash screen followed by a new DEVS animation. You can now remove the MicroSD card; it won't be needed again. Your Nook will finally come to rest on a screen that says LogicPD Zoom 2. Skip the screen instructions (they are for system builders) and go directly to the Google Account setup page.
Because this root bypasses the majority of system controls, the account configuration doesn't work properly, so you have to register through the YouTube application. Access YouTube through the extras menu. Open the My Channel option to access your account.

Software

Auto-Nooter includes the Softkeys program. This will add touchscreen buttons to the display to allow you to compensate for the single interface button on the Nook. Auto-Nooter also installs Android Market, Busybox shell, Android calendar, calculator and e-mail client. Since you aren't going to be using your Nook for just books anymore, you should download Launcher Pro as a new graphic interface and the Dolphin HD Web browser.
If you have problems with this root, visit XDA Developers and visit the forums or the Quinxy von Besiex page on NOOK modding FAQs

BIO:
Ken Sleight is a freelance writer and tech blogger currently working on a full dissection of the New iPad. When he isn't knee-deep in computer parts, he can be found posting various green living tips on his HubPage.

Steps to Root Samsung Galaxy Ace S5830


Root Samsung Galaxy ACE 5830

Did you know that you could easily root your Samsung Galaxy Ace S5830 running on Android 2.3.5 Gingerbread DDKQ5 or DDKQ6? But before we continue, let me suggest that you check your firmware version first. To do this simply go to Settings > About Phone > Firmware Version. You can find valuable information on what type of firmware version your device has by following the said procedure

What is Rooting?

For the benefit of those who are not familiar with rooting, it is like jailbreaking your phone to support neat new features normally not found on a smartphone. You can make your phone run faster, install custom ROMs, and install (sideload) applications from third-party sources once you gain root access on your device.
But you have to keep in mind that rooting your device could mean voiding its warranty. Although, there is usually the option of unrooting your device by updating it with a stock ROM. Overall, rooting can be a win-win situation.

Things to Consider Before the Rooting Process:

  • Remember to back-up your files as a precautionary measure just in case your phone data, call log, text messages, and media files get erased in the process.
  • Your phone should be at least 60% charged before proceeding with the rooting process.
  • Enable USB Debugging on your phone by going to Settings > Applications > Development > USB Debugging.
  • You must close all potentially conflicting applications on your computer such as antivirus software, Samsung Kies PC Suite, and firewall software, as they tend to disrupt or block the rooting process. You also need to uninstall/remove unnecessary applications that cause your phone delays.

Steps to Root Procedures:

  1. Download the latest Galaxy ACE Rooting Package to your computer. Get the file here (about 925 KB).
  2. Have your phone connected to your computer via USB cable.
  3. Make a copy of the downloaded ZIP file to your phone’s SD card without renaming or modifying the file.
  4. Turn off your phone and reboot into recovery mode by simultaneously pressing and holding the Volume Up + OK button, and pressing the Power button.
  5. Your phone will boot to the recovery mode screen. From here, choose “Install zip from SD Card” and select “Choose Zip from SD”.
  6. Locate the ZIP file that you just copied to your SD card (the one named “upd_1.zip”) by using the Volume Up and Volume Down keys. Press the Power button to select it.
  7. Wait for about 5 – 10 minutes for the rooting process to finish.
  8. Your phone will automatically reboot once the rooting process is done. If it fails to do so, go back to the main menu by selecting “++++ Go Back ++++” and select “Reboot System Now” to manually reboot your phone.
Congratulations! Your Samsung Galaxy Ace has been successfully rooted. You can now enjoy the benefits of having a rooted device.

>>  if you like my post then hit the Facebook like Button and Connect with us.  <<

Best 5 Android Phones Under Rs 10,000/- In India


Almost a year ago, Android phones under the Rs 10,000 category were not great enough to attract consumer attention. With sluggish performance due to myriad hardware models and delayed updates, several users preferred to wait till good Android handsets showed up in that price range.

Now we have a range of relatively powerful mobile phones that can run the latest Android OS smoothly. It is indeed very important to know the version of Android the mobile phone uses to make the best of it.

Android phones under Rs 10,000 are expected to have a feature rich package. They need to have a reasonably large capacitive touchscreen, decent processor, at least 3.2 megapixel camera and, of course, a recent version of Android OS.

Here is a list of the best mobile phones one must consider while buying a new Android phone for Rs 10,000 or less.

LG Optimus Net P690  (Rs 9,999) 

Successor to the popular Optimus One, the new Optimus Net P690 has instantly been accepted as a budget friendly smartphone, mostly because the phone is a feature rich package. Optimus Net P690 has a 3.2 inch touchscreen display with 320 x 480 pixel resolution and runs Android 2.3 Gingerbreadoperating system.

Under the slim chassis, Optimus Net houses an 800 MHz mobile processor along with 512 MB of RAM, which is a good enough combination to run Android 2.3 Gingerbread smoothly. If third party developers get interested in this device then perhaps a custom ROM with Android 4.0 Ice Cream Sandwich might be supported on it.

Supporting 3G networks, Optimus Net offers wireless connectivity via WiFi and Bluetooth 3.0 as well. LG has used a 3.15 megapixel camera at its rear for decent quality photos to be uploaded and shared on social networks.

Finally, a mobile phone with a seemingly fast processor, decent camera and capacitive touchscreenshould be your best bet if you plan to spend under five figures.

Samsung Galaxy Y S5360  (Rs 7,500) 

Packing a 3 inch capacitive touchscreen, the new Galaxy Y is quite popular amongst users of all ages and occupations etc. It's one of those mobile phones that come with Android 2.3 Gingerbread pre-loaded and with a flavour of TouchWiz user interface layered on it. Galaxy Y GT-S5360 mobile phone houses an 832 MHz processor to run the mobile operating system smoothly with 290 MB of RAM.

The compact candy-bar form factor makes it quite enjoyable and easy to hold. The Galaxy Y also comes in a special package - Galaxy Y Color Plus, which packs four additional inter-changeable backpanel covers, just like the Samsung Corby series phones. The Galaxy Y is kind of disappointing with a mere 2 megapixel camera at the back without any secondary camera in front.

Galaxy Y also features WiFi and Bluetooth 3.0 support. Of course, it comes with FM radio that works with an RDS and location services chip with A-GPS. Not counting the camera, this handset offers the best budget friendly Gingerbread experience.

Sony Ericsson W8  (Rs 9,300) 

Sony Ericsson's Walkman series mobile phones come with the special Walkman software and audio profiles loaded in them. The new Sony Ericsson W8 features a nice 3 inch capacitive touchscreendisplay and Walkman branding targeted at music lovers. By default the mobile phone bundles a 4 GB microSD card for music files.

Unfortunately, Sony Ericsson's Android phone buyers have to wait for weeks to get the latest update and enjoy a smooth OS experience. W8 comes with the age old Android 2.1 Éclair operating system that is powered with a 600 MHz mobile processor and a mere 168 MB of RAM. However, this mobile does not have enough hardware muscle to run even Android 2.3 Gingerbread smoothly, let along the upcoming Android Ice Cream Sandwich

Sony Ericsson has added custom Walkman styling with the TimeScape interface, bringing a W shortcut to the top right corner of the homescreen. This smartphone supports 3G networks and also offers WiFi support for wireless internet connectivity. It is a good phone which does appear slightly over priced. If you wish for a good music experience with your favourite pair of earphones and a fancy looking mobile, W8 should be the apt choice.

Motorola Fire XT311  (Rs 8,950) 

Android is indeed cumbersome to use with a Qwerty smartphone in candybar form, but if there's acapacitive touchscreen involved, the task is a wee bit easier. Motorola Fire XT311 is a Qwerty candybar phone with 2.8 inch capacitive touchscreen display supporting 240 x 320 pixel resolution.

Fire is one of the good entry level Motorola devices with Android 2.3.4 Gingerbread operating system for those who wish for the fastest and best features. Under the hood, Fire XT311 houses a 600 MHz mobile processor that might appear a bit slow, but is decent enough to run the operating system with a 256 MB RAM and 512 MB ROM.

The Fire XT311 is one heck of a good looking Android smartphone. It is very different from the dual-SIM EX119 that has a minimalist design. This mobile phone promises talk time of 7 hours on 2G networks and 5 hours on 3G. Considering the healthy talk time and physical Qwerty keypad, Fire XT311 is indeed worth a try.

Micromax Superfone Lite  A75 (Rs 8,900) 

Micromax launched the iPhone 4-mocking Superfone with a bang and quietly slipped in the Superfone Lite, which is a stepped down version of the former model. Superfone Lite A75 comes with Android 2.3 Gingerbread. Micromax offers a 3.75 inch capacitive touchscreen display to enjoyGingerbread goodness to the maximum without spending more.

Under the hood, it packs a 650 MHz mobile processor and offers dual GSM SIM support with dual-standby mode. 3G and WiFi enabled, this mobile phone is expected to eat up loads of battery life and that's why the company has packed a 1300 mAh battery, which is pretty decent for a budget phone. Then again, Superfone Lite comes with just 256 MB of RAM and there would be performance as well as battery issues on dual-SIM mode.

All the above mobile phones are available in Indian markets at different rates in different regions because of the variable taxes, octroi and other charges.

Top 10 Productivity Mobile Apps


Mobile applications have provided us with much needed information and tools to utilize with our smart phones. Some of these apps help us organize our information such as phone numbers, your service provider's customer service number, and other valuable data. Some applications help us guard our data and protect unauthorized companies from obtain our phone numbers.

1. Ever-note is one of the most downloaded applications in the market. It is a simple tool which allows its users to take small notes throughout the day. It also allows for voices to be recorded and photos to be taken.

2. Dropbox is an online data storage unit which allows you to place your important files so you may access them anywhere you go. For signing up, users receive a free storage amount of 2GB which can be expanded without payment, or with payment.

3. Swiftkey is an application that assists you as you are typing on a smartphone. It can be difficult to use a touchscreen, so Swiftkey guesses the word you are typing and you may select the appropriate word.

4. Kindle is for those who love reading. It allows for you to access books, as well as read them. They even have an online store in which you may purchase books.

5. Shazam is an application in which it will help you identify a song you have had on the tip of your tongue. Hold your phone up to the music, and Shazam will attempt to identify the song!

6. Omnifocus uses global positioning satellites to remind you of your chores based on the location you are in. This could be useful for getting multiple chores done in one day.

7. Find My Car! Is an application which helps you find your car's location. It will pinpoint your car and put it on your smart phone's map instantly.

8. For those who enjoy music Spotify is an application which streams music directly to your phone. It's a good application for when you're bored and need something to do.

9. Datavault Password Manager is another useful application which memorizes all of your passwords. This is useful because it will help you by preventing you from losing your various passwords.

10. WordLens is probably the most useful application available. It will use your camera to translate foreign text into your native language. It is very useful to have around when you travel.

Written By Daniel, Catch me @thetechlegend on Twitter.

How to take 800 photos a minute with your iPhone


Fast Camera can take up to 800 photos a minute on your iOS device, all without you doing anything. Read on to find out more.
 1. An iOS app, Fast Camera, aims to help people never miss an important photo again. When the user launches Fast Camera, your device will instantly start taking pictures. 
Fast Camera, which is usually $0.99, is free in the App Store today, and today only.


2. Upon launching the app, you will begin to hear a camera shutter sound almost instantly. Fast Camera is already taking pictures, and it won't stop until you press the stop button. You can see the number of pictures that have been taken in the lower-left corner of the screen.


 3. Once you press Stop, you can tap on the photo count to review your photos, or Start to resume taking pictures.


4. When reviewing the photos, you'll be able to save the good photos to your camera roll. Once you are done reviewing, the leftover photos will be deleted.


5.In the settings of Fast Camera you can change the picture quality, the default camera, and set a delay. The delay will begin counting down once you launch the app, followed by a barrage of photos being taken, again requiring you to press Stop to stop taking photos.

6.Fast Camera can take up to 800 photos a minute using the front camera on the iPhone 4S, and 720 photos per minute on the iPad 2. 

7.I put the 800 photos a minute claim on the iPhone 4S to the test, and was able to take 783, 785, and 789 photos in 60 seconds. So I fell a bit short of the 800, but 789 photos in a minute is still very impressive.
Were you able to get to 800 photos a minute? Leave a comment below and let us know!


If You Like This Post Or Site 
Then Please 

How to transfer contacts from Nokia to iphone


Now i have iphone and i have to transfer contact from my nokia phone to iphone, I thought that I would have to copy all the contacts one by one as mine is a locked phone which I have taken on a contract from O2 (here in UK) which kept me away from doing that till now. But then I found out an easy way to do it which took me not more than 10 minutes to copy all my contacts from Nokia to iphone.


Copying Contacts from Nokia Phone to MS Outlook

Step 1:

You need to Install  Nokia PC suite on your machine, if you do not have it already. Also, You need to have MS outlook or outlook express installed on your computer.
Contact your Nokia phone to your computer using data cable or Bluetooth.

Step 2: [Updated]

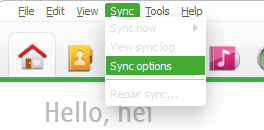
Go to Sync >> Sync Options.
Sync - Sync Options - Nokia Ovi Suite
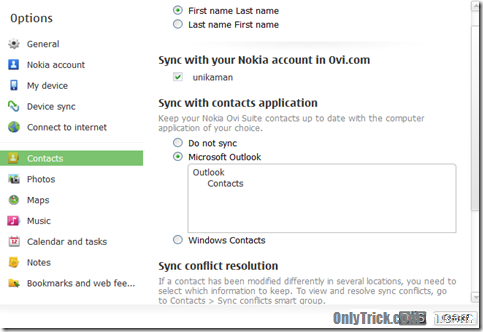
Now, click on ‘Contacts’ in the left section, and then select the option “Microsoft Outlook” (radio button) under the section “Sync with contacts application.” Now, click on OK in this window.

Step 3: [Updated]

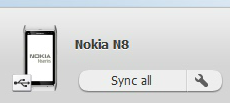
Now, click on ‘Sync’ button for contacts in the Ovi application home. You will find this in the lower left corner when you click on the Home Tab or Contacts Tab on your Nokia softwere. If you want to sync all you data, you can click on ‘Sync All’ option which is shown in the Home tab, or you can click on ‘Contacts’ tab and this same button will change to ‘Sync Contact’ clicking on which you will be able to sync only your contacts.
[As I no longer have my Nokia 5800 with me, I have shown below a screen grab from Nokia help section.]
Sync Option on OviSuite Home
This synchronises the contacts from your Nokia  with your MS outlook, this will transfer all your phone contact to MS outlook.
After you get the above confirmation message, close the Nokia PC suite, disconnect Nokia Phone from computer.

Copying Contacts from MS Outlook to iPhone

Once the Steps 1-3 are completed, all your contacts are copied to MS Outlook on your machine.

Step 4:

Connect the Apple Iphone to your computer and launch Apple itune.Click on your iPhone Device in the left tab on iTunes which will show the summary of your iPhone.

Step 5:

Click on the Info tab for your Apple iPhone.
Click on the check box for “Sync Contacts with” and leave the value selected as default i.e. Outlook. Leave the option selected as All Contacts below that. Refer to the screenshot below. (Click to enlarge)

Step 6:

Click on the Apply button.

iTunes will start syncing your Microsoft Outlook contacts on to your new iPhone and once it gets completed, you can see all your Nokia Phone contacts on your new iPhone.
And, you are done!!
You can use the same steps above to copy the contacts vice-a-versa as well, that is, from your iPhone to Nokia. Also, this can be used to transfer contacts between any other phone (which gives the option to sync with Outlook) and iphone
Hope you find this post easy and informative. How do you transfer contacts between your phone, do share with us if you have a better way of doing it.

Yahoo Messenger and Y! Mail Official Apps v2.0 Released for Java Download Here


Yahoo! Y! Messenger 2.0
Yahoo! Y! Mail 2.0
The new Yahoo! Y! Mail 2.0 and Yahoo! Y! Messenger 2.0 now available for Java J2ME phones. The mail and messenger apps allow you to quick login to your yahoomail account and faster and easy chat with your online buddies anytime anywhere.

With both Yahoo! Mail and Messenger you can experience the much faster, smarter, richer feel. The apps are made exclusively for your Java-enabled phones.

Yahoo! Mail Features:
~Access all of your favorite mail features:
~Read, reply, compose, send, and receive/download mail attachments
~Manage your messages:
~Delete, mark as spam, mark as unread or move your mail into folders
~Always available:
~Access, compose and find mail fast—even when you are offline

Yahoo! Messenger Features:
~Experience the faster, smarter, richer Yahoo! Messenger
~ Made for your Java enabled phones
~ Free SMS
~ Chat with Windows Live Friends
~ Chat with your Buddies any time

Download Links Yahoo! Y! Mail 2.0 and Yahoo! Y! Messenger:

YMail_260418.jar (250 KB)
YMail_260418.jad (Signed, 5 KB)
and
YMessenger2.jar (285 KB)
YMessenger2.jad (Signed, 5 KB)